در ادامه سری مقالههای مربوط به معرفی متدهای Load Balancing در میکروتیک، قصد داریم به معرفی و روش پیاده سازی متد Firewall Marking بپردازیم، شرکت پردیس پارس مجری ارائه خدمات شبکه در حوزه های مجازی سازی شبکه، خدمات میکروتیک، نصب و راه اندازی سرویس های مایکروسافتی، راه اندازی و خدمات سیسکو، راه اندازی فایروال، راه اندازی بکاپ سرور، خدمات مانیتورینگ شبکه، راه اندازی VoIP و پشتیبانی شبکه می باشد.
معرفی و روش پیاده سازی متد Firewall Marking :
اول باید مشخص کنیم قصد جداسازی چه نوع ترافیک هایی را داریم، در این مثال ما از ترافیک های مشخص شده زیر برایPer Traffic Load Balancing استفاده می کنیم.
- (HTTP Traffic (Port 80
- (SSL Traffic (Port 443
- (POP3 Traffic (Port 110
- (SMTP Traffic (Port 25
سناریو
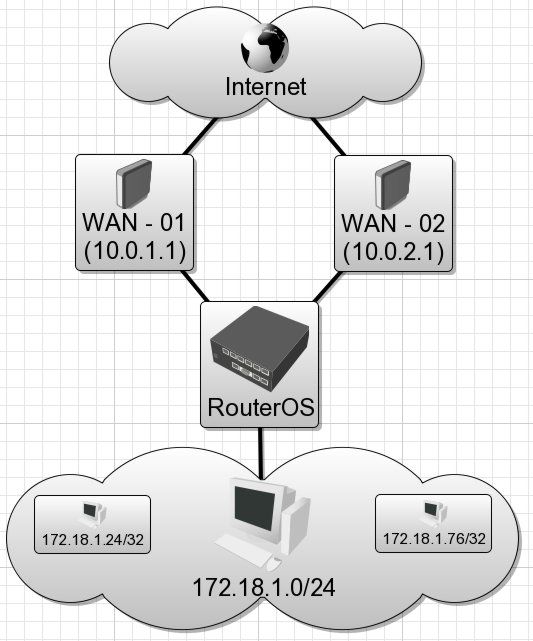
در این سناریو فرض بر این است که رنج شبکه داخلی ما 172.18.1.0/24 و دارای دو خط اینترنت به نام های WAN-01 و WAN-02 هستیم با Gateway های 10.0.1.1/24, 10.0.2.1/24.
بر روی اینترفیس WAN-01 آدرس IP 10.0.1.2 و بر روی WAN-02 آدرس IP 10.0.2.2 ست شده است.
- گام اول ساخت یک آدرس لیست برای کسانی که حق استفاده از اینترنت را دارند.
ip firewall address-list/
”Add list=”Allowd-Internet” address=172.18.1.0/24 comment=”” disabled=”no
- گام دوم ساخت یک آدرس لیست برای Subnet های شبکه داخلی
ip firewall address-list/
add list=”WAN-01″ address=172.18.1.24/32 comment=”” disabled=no
add list=”WAN-02″ address=172.18.1.76/32 comment=”” disabled=no
- گام سوم تنظیمات NAT
با این کارNAT بر روی هر دو اینترفیس WAN فعال خواهد شد.
ip firewall nat/
add chain=srcnat action=masquerade out-interface=”WAN – 01″ src-address-list=”Allowed-Internet” comment=”Gateway 10.0.1.1/24″ disabled=no
add chain=srcnat action=masquerade out-interface=”WAN – 02″ src-address-list=”Allowed-Internet” comment=”Gateway 10.0.2.1/24″ disabled=no
- گام چهارم استفاده از Mangle برای Mark کردن بسته ها
ip firewall mangle/
add chain=prerouting action=mark-routing new-routing-mark=”WAN-01″ src-address-list=”WAN-01″ passthrough=no comment=”” disabled=no
add chain=prerouting action=mark-routing new-routing-mark=”WAN-02″ src-address-list=”WAN-02″ passthrough=no comment=”” disabled=no
add chain=prerouting action=mark-routing new-routing-mark=”HTTP traffic” passthrough=no dst-port=80 protocol=tcp comment=”” disabled=no
add chain=prerouting action=mark-routing new-routing-mark=”SSL traffic” passthrough=no dst-port=443 protocol=tcp comment=”” disabled=no
add chain=prerouting action=mark-routing new-routing-mark=”POP3 traffic” passthrough=no dst-port=110 protocol=tcp comment=”” disabled=no
add chain=prerouting action=mark-routing new-routing-mark=”SMTP traffic” passthrough=no dst-port=25 protocol=tcp comment=”” disabled=no
دو خط اول با فرض اینکه که ترافیک کاربر با هیچ کدام از ترافیک های مشخص شده همخوانی نداشته باشد است، که در اینصورت ترافیک subnet اول شبکه داخلی با WAN-01 و subnet دوم با WAN-02 مارک زده می شوند.
- گام پنجم و نهایی نوشتن Default Route
ip route/
add dst-address=0.0.0.0/0 gateway=10.0.2.1 scope=255 target-scope=10 routing-mark=”HTTP traffic” comment=”” check-gateway=ping disabled=no
add dst-address=0.0.0.0/0 gateway=10.0.2.1 scope=255 target-scope=10 routing-mark=”SSL traffic” comment=”” check-gateway=ping disabled=no
add dst-address=0.0.0.0/0 gateway=10.0.1.1 scope=255 target-scope=10 routing-mark=”POP3 traffic” comment=”” disabled=no check-gateway=ping
add dst-address=0.0.0.0/0 gateway=10.0.1.1 scope=255 target-scope=10 routing-mark=”SMTP traffic” comment=”” disabled=no check-gateway=ping
add dst-address=0.0.0.0/0 gateway=10.0.1.1 scope=255 target-scope=10 routing-mark=”WAN – 01″ comment=”” disabled=no check-gateway=ping
add dst-address=0.0.0.0/0 gateway=10.0.2.1 scope=255 target-scope=10 routing-mark=”WAN – 02″ comment=”” disabled=no check-gateway=ping
add dst-address=0.0.0.0/0 gateway=10.0.1.1 distance=1 check-gateway=ping
add dst-address=0.0.0.0/0 gateway=10.0.2.2 distance=2 check-gateway=ping
بر این اساس ترافیک های Http,SSL از WAN-02 و ترافیک های SMTP,POP3 از WAN-01 عبور خواهند کرد، دو خط آخر برای این است که در صورتی لینک WAN-01 یا WAN-02 از کار افتادند ترافیک از لینک بعدی گذر کند.


